Showing posts with label cuff bracelets. Show all posts

Tuesday, June 26, 2012

My First Cuff

I should clarify that to say my first METAL cuff!  I've made several bead embroidered or freeform cuffs, but I've never made one from metal.   I've wanted to for a long time but I never had the materials I needed, or I didn't have the right tools, or I just plain didn't have the courage to try it!  Well, yesterday I decided that I had the copper sheet, and I had all the tools I would need, and as far as the courage, well, that was going to have to just show up!  I had seen a copper cuff in Bead and Button's June issue that I liked the shape of but not the details.  So, I decided to draw a similar shape and make my own details.  I have wanted to try an embellishment that Lisa Niven Kelly uses on one her projects in her book Stamped Metal Jewelry.  So, I thought I'd give it a go since everything seemed to come together, design idea, tools, and materials.  I love the results.  Anyone who knows me, knows this my style!


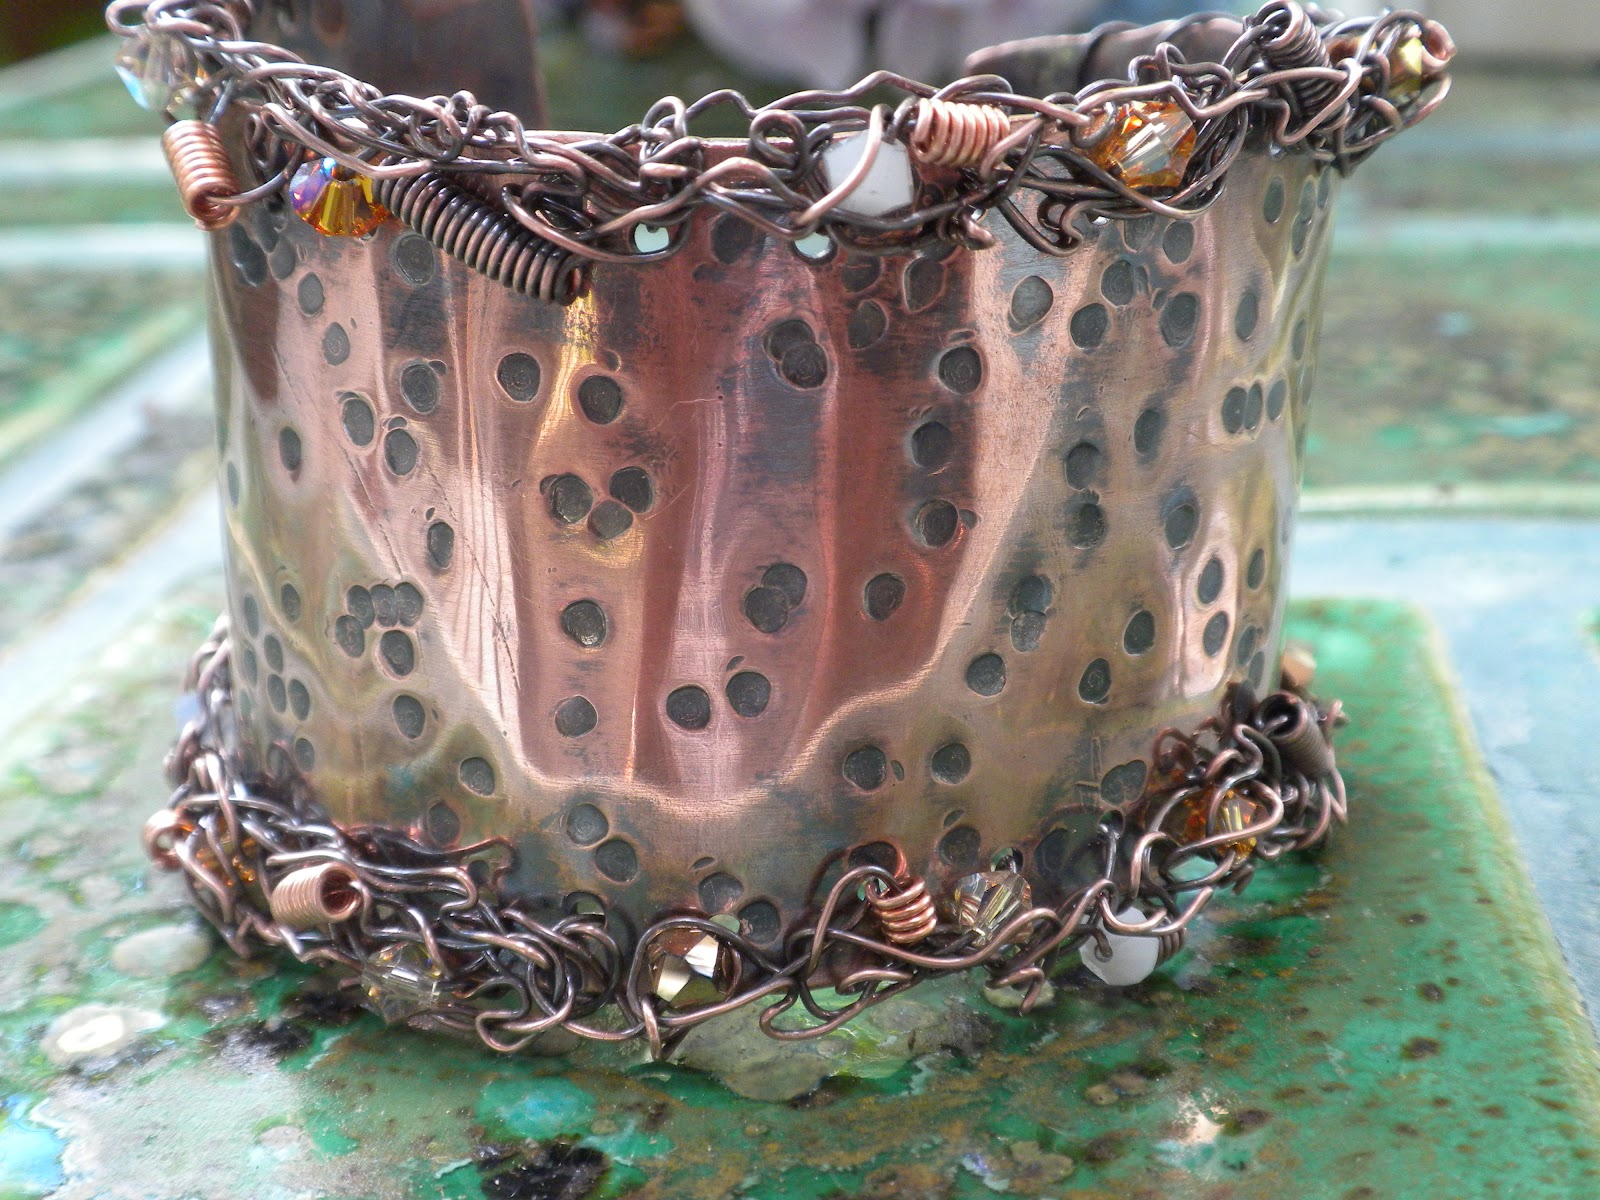
I had a large piece of 20 gauge copper sheet, so I drew an asymetrical shape on paper and traced it on the sheet.  It was an adventure cutting it out.  I've only used a jeweler's saw one other time and since metal shears weren't working too well, I decided to get my saw out.  Well, several blades later I had the piece cut out.  Of course it was very rough and sharp on the edges, so I filed, and filed, and filed, and ended up with sanding.  But, as I kept at I began to realize I was starting to get a rhythm going and it became enjoyable to watch the sharpness become smooth.  Once that was done I textured the surface and punched holes along both long sides.  Then I shaped it into a cuff.  I should say that I have a very small wrist and so I was never able to buy cuffs that fit me.  I've loved cuffs since I was a teenager and was always disappointed that I couldn't wear them.  Once I was able to bead my own cuffs, I loved it.  Now I'm able to shape a metal cuff to fit me! This morning I oxidized the metal and the wire for the embellishment and then gathered my tools and crystals and took them out onto our screened porch and sat in the glorious weather we're having today and started to embellish.  Anyone who has followed along with me on this blog knows that embellishing anything is my favorite thing to do.  The technique that Lisa shows in her book involves lacing wire along the edge of the project.  In the book the project is a beautiful silver pendant.  As you lace you string on a bead or crystal (I love crystals with metal!), and lace into the next hole.  After a few lacings you double back and go through the wire already there.  Most of the embellishment is the wire with just a few wire wrapped pieces I made and the crystals peeking out of the lacings.  It was fun to see where the wire and beads ended up.  The results you can see in the picture!  I'm so happy with it that I had to share it!  Here's another picture from a different angle.


I learned a lot about working with metal and I also learned that I need a lot more practise with a saw!  I also know that I want to use this lacing technique on other metal jewelry. It's fun and has a lot of possiblities for adding beads and color to metal. 

Thanks for stopping by today.  I hope you are all having a beautiful summer day like we are here in Maryland. 


Monday, May 7, 2012

Some bead embroidery

Since I began my creative life with embroidery it followed that when I discovered bead embroidery I'd be totally taken in by it!  While embroidering with beads is certainly different than with thread or yarn, I find that I get the same satisfaction from doing it.  And, as with most of what I do, I find that I improvise a lot.  Here is a picture of one of the first projects I made using bead embroidery.


I used a Czech glass button as the focal and took off from there.  I learned several things from this cuff.  I think the most important thing was that using the same color beads with different finishes give a piece lots of texture and variation.  I also discovered that you can incorporate some peyote stitch in embroidery for an accent.  In this piece I worked a peyote tube off a back stitched row of beads. 


You can see the peyote tube in this picture.  I also discovered that I like short fringe using lentils or glass rings in a bead embroidered piece.  Some fringe with the glass rings are coming out of the peyote tube.


This is the other side of the cuff and you can see the turquoise beads are shiny and raku and the effect it gives.  Also, the  moss stitch in the lavender beads are two finishes, silver lined and unlined.  

This was a fun project for me because I learned so much from it and I ended up with a very wearable cuff.  I learn things from each project I do because each one offers it's own opportunity to try something different.  My favorite books on the subject are Jaime Cloud Eakins' books, especially her new one, Dimensional Bead Embroidery.  Sometimes I just pick it up to look at all the eye candy.  But, it also has wonderful information and guidance on design and stitches.  Sherry Serafini is also very inspirational and provides lots of eye candy and good instruction in her books.  Check them out if you haven't already and you're interested in bead embroidery.

Well, thanks for stopping by today.  I hope you have a great day!


Thursday, April 21, 2011

Button Swap Day!


Today is the day that we get to see what everyone who participated in Michelle Mach's button swap.  I've been really excited about this, since it's always so inspiring to see what everyone comes up with in a swap.  The pieces are all so different, but so inspiring! 


Anyway, the idea behind the button swap was the usual formula, Michelle took all the names of the people who signed up and paired them with other people.  You had to send your partner 3 buttons from your stash, so much the better if one or more were vintage or handmade.  Well, I was paired up with Hope of  Craftyhope.blogspot.com.  Well, I was overwhelmed when Hope's package arrived!  It was amazing!  She not only sent the 3 required buttons, which were fabulous, but she sent a whole stash of other buttons!  And, to make it better she made adorable tins and a card to go along with the buttons!!! 


Isn't that fantastic?!!  Well, I love the 3 buttons, especially the carved ivory flowers.  And the were all so vintage looking, that I decided I had to do something that played on the vintage feel of the buttons. So, I went back to my idea of using knitted wire in a mixed media design.  At a bead show I had gotten a new color of art wire, Rose Gold.  It's a lovely old-timey pink with a golden glow.  So, I thought this would be the perfect project to use it.  I knitted a cuff and decided a linen base would keep to the vintage look.  I was going to sew the wire to the linen and then the buttons on top of the wire, fringe the edges of the linen and sew snaps on as a closure.  That was the original plan.  But, as you can see below, that's not exactly how it ended up.


When I laid it all out, I thought the piece looked very flat and uninteresting.  Just layered, linen, wire, buttons, was terribly boring.  So, I took the wire and scrunched it up.  In doing so I creating a ridge which I then maniputlated some more to create little 'cups' to nestle the buttons into.  I loved the dimensional feel of the piece, and an added benefit was the wavy edge that resulted from scrunching the wire.  I knew I had something I liked a lot.  So, I proceeded as I had planned and sewed the wire to the linen and the buttons nestled in the wire.  Of course, my favorite button, the carved flowers, figured prominently, and another of the original 3, a fantastically shabby chic glass button.  But, I also used one from the extra stash Hope sent, the little pink with the flower and rhinestone center.  A pearl button that I had in my stash finished off the set.


I'm really pleased with the cuff.  I wore it yesterday and received compliments on it.   That was nice!  

This was a fun swap.  I love buttons and it allowed me to try another idea for knitted wire.  This cuff has generated another idea for a cuff with a summery seaside theme.   The swap also introduced me to Hope and her great work.  So, a win, win all around! 

Michelle is sponsoring a contest to coordinate with the Button Swap Reveal.  If you comment on all the participants blogs you'll be entered to win a button collection.  So, below you'll find the list of participants in the button swap.   Go check out what everyone did with their buttons and you may win some buttons, and everyone can use more buttons, can't they?  I don't think you can ever have too many!


6. Donna, Marti, and Michelle- http://www.michellemach.com/blog/


Hope you have fun checking out all the participants.